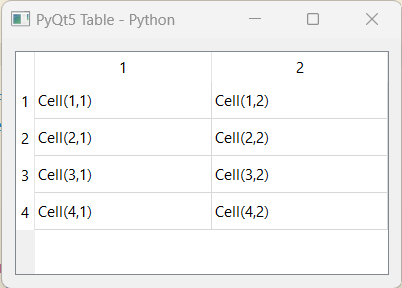
Create a Table using PyQt5 in PythonWe will learn how to add and use a table in our PyQt5 application in this tutorial. A table is a row-and-column data layout that is often used in data analysis, research, and communication. QTableWidget allows us to add one or more tables to our PyQt application. We will use the example of wanting to display the name and city of several persons in a table in our application to further illustrate the concept. From a database, JSON file, or any other type of storage system, we may extract the data. Before beginning the project, a few fundamental PyQt5 requirements :The most efficient way to manage dependencies in Python is by utilising a virtual environment. A virtual environment is, to put it simply, a local directory that contains the libraries required for a certain project. A system-wide installation of those libraries, on the other hand, would affect all of your projects. One instance of QApplication must be present in every GUI programme; this is a Qt requirement. Several Qt components cannot be used until the import line has been executed. It will thus be necessary in practically every PyQt programme you write. Buttons, labels, windows, conversation boxes, progress bars, and other widgets are all instances of PyQt apps. Like HTML components, widgets are often nested. A window, which may also have a label, may contain a button, for example. One of the benefits of Qt is its support for custom styles. There are several ways you may change the way your application looks and feels. Along with the aforementioned, style sheets let you change how your application looks. This is Qt's rendition of CSS. Walking through the code :First of all, we will import all the required files into our program from the standard python library. These files include sys and QtWidgets. Then, we will create a new class for our program. In that we will set the title for the window and set the geometry for the same. Then, we will add the table widget and start to create a table. Next, we will define the rows and columns of the table and lastly, we will make the adjustments to the table. Finally, we will create the application base, create an instance of the window and will execute the program. Complete code :Output: The output of the code mentioned above is attached below in the form of a screenshot.  |

We provides tutorials and interview questions of all technology like java tutorial, android, java frameworks
G-13, 2nd Floor, Sec-3, Noida, UP, 201301, India


